Showing posts with label seedlings. Show all posts

Wednesday, April 3, 2013

How to transplant Green Beans from the Burpee Greenhouse to a pot

Burpee Greenhouse Part 1 | Burpee Greenhouse Update


Seedlings


Here are the Seedlings, all ready for transplanting.

Jiffy Greenhouse on the bottom right, Burpee Greenhouse on the top right.

Go here for how to transplant from a Jiffy Greenhouse.


Green Beans


Here we have an up close view of the Green Beans.

The directions says to use a tool to help remove the root ball from the Greenhouse.

I'm using a disposable tongue depressor.

They're cheap, biodegradable, and have many uses in the garden: seedling plant stakes, digging holes for seeds, writing names on them, etc.


Green Beans


As you can see, I'm gently separating the root ball from the Greenhouse cell.

I'm going to reach under the cell and push up on it to loosen the bottom of the root ball, and if it works right, it will pop out of its holder and into my hand.

Remember, be careful and gentle and move slowly. The seedlings are fragile.


Green Beans


If all goes well, you should end up with a green bean with a root ball that looks similar to this.

If you don't see roots wrapped around the plant, you may need to wait longer before transplanting. Try to put it back in the cell if you can.

Otherwise, move on to then next step.


Green Beans


While supporting the plant in one hand, use your fingernails to gently separate the root strands.

Try not to break any, just detangle them from the root ball as seen here.

Some people say to pick apart every bit of root ball, but I'd just get the biggest roots apart just to give the plant room to grow.

I've killed seedlings trying to pick all the roots apart.


Green Beans


Next, prepare the pot. I'm using peat moss I picked up from Home Depot mixed with a little bit of the garden soil.

I'm not transplanting these into the garden just yet. These pictures were taken in mid-March, it was much too cold still.

It's April now, and I'm still waiting a few weeks before transplanting to the garden.

Dig the hold just wider than the root ball, and deep enough so the roots you detangled can spread out.


Green Beans


Then, with both hands, gently place the seedling into the pot.

It's much easier to do this if the soil is damp already.

Not only is it easier to plant, you can tell how much soil you need in the pot if it's compressed down a bit.


Green Beans


And there you have it: transplanted green beans.

I'm leaving these guys inside under lights mostly still, but if the weather is good they are outside in the part sun/shade to get used to the outdoors.

In a few more weeks, they'll go outside to the garden.

Tuesday, March 19, 2013

How to Build Garden Stakes from Bamboo

This is as cheap and easy as plant stakes get. They're homegrown, won't rust like metal stakes, and bamboo actually lasts a few years out in the elements.


The plant on the right is in a huge pot (don't plant it in the ground unless you want a bamboo forest all over your yard) that allows it to grow 8-10 ft. stalks.


The plant is about 12 years old. Regular trimming helps keep it healthy. It needs fertilizer once a month during the spring/summer.

It also needs quite a bit of water during the summer. 


Depending on the heat (in Georgia it gets to the 100s) it may need water 2-3 times per week.


Or more. I usually let the hose trickle slowly on the plant for 15min to saturate the roots fully.


bamboo
To make stakes, I trimmed two stalks off with rose clippers. I only need a 6ft stake for the peas I'm planting.


You can measure the stalk if you want, but I just eyeball the height I want and cut it off where the bamboo becomes too narrow to use as a stake.


I also use these stakes for tomatoes and other vegetables. I'll also use them to hold up my bird block fence.


bamboo
There. All trimmed and ready to use in the garden. I just used the rose clippers to trim off the leaves as close to the stalk as possible.

The leaves will compost, but the twigs will take a long time to break down if they're thick.


Sometimes, I like to leave a little edge of stem to give the plants something to hang on to as they climb the bamboo.


For example, the pea plants will like to climb up it.


bamboo stakes
I used garden twine to tie three bamboo stakes together.

Then, I sunk each stake about 6-12in. deep in the soil.


Then, the pea plants were planted. 

I use these bamboo stakes for everything that climbs in the garden. 

You can make a trellis out of it for cucumber, or use it to make a bird block fence.

Transplanting Seedlings to the Garden from a Jiffy Greenhouse


Well, most of the Seedlings are Transplanted today...


Jiffy Greenhouse Part 1 | Jiffy Greenhouse Update

About a month after planting my Jiffy Greenhouse, the seedlings mostly look like this:


Spring Peas
The peas have just about outgrown their little peat pot, so it's time to kick them outside into the garden.


For the last week, I've moved the greenhouse outside into the part shade to let the peas get used to the sun.


In the foreground, you can see the peat with nothing growing in it from where the mold killed off the seeds/seedlings.


The two green beans that lived are going to be my little experiment to see if the temperatures are right for the other green beans.


I'm not expecting success in this, (the nights are still below freezing) but it's worth it, for science.


Garden Bed
Here's the garden bed I'm using. It is mostly composted horse manure mixed with peat moss and north Georgia dirt, surrounded by wood timbers.


Grass does manage to grow around it in the summer. The fence does a dual job of keeping the dog in the yard and the deer out.


Squirrels and chimpunks, not so much. That's what bird block is for.


Spring Peas
Here you can see the peas outside of the greenhouse and in the garden.


According to the box, they don't need to be removed from the peat pods, just plunked down into the dirt with a bit of the top sticking out of the soil.


I placed each plant roughly where I'm going to place the bamboo poles that will help hold them up.


This is as cheap and easy as plant stakes get. They're homegrown, won't rust, and bamboo actually lasts a few years as a plant stake.


The plant on the right is in a huge pot (don't plant it in the ground unless you want a bamboo forest all over your yard) that allows it to grow 8-10 ft. stalks.


The plant is about 12 years old. Regular trimming helps keep it healthy. It needs fertilizer once a month during the spring/summer.


bamboo
I trimmed two stalks off with rose clippers. I only need a 6ft stake.


You can measure the stalk if you want, but I just eyeball the height I want and cut it off where the bamboo becomes too narrow to use as a stake.


I also use these stakes for tomatoes and other vegetables. I'll also use them to hold up my bird block fence.


bamboo
There. All trimmed and ready to use in the garden. I just used the rose clippers to trim off the leaves as close to the stalk as possible.

Sometimes, I like to leave a little edge of stem to give the plants something to hang on to as they climb the bamboo.

For example, the pea plants will like to climb up it.


bamboo stakes

I used garden twine to tie three bamboo stakes together.

Then, I sunk each stake about 6-12in. deep in the soil.

The pea plants went in next.

I followed the directions on the Jiffy box and left a little lip of the peat pod sticking out of the soil.

Now we'll see if they'll grow.

In a week or two, I'll use garden twine to tie the pea plants to the stakes loosely to help them climb it. I may add mesh to the stakes to help them climb upwards as well.

bird block

You can barely see it, but this is what the bird block fence looks like.

I used bamboo poles and garden twine to tie a fence around the garden.

The bird block can be reused for a few years before it disintegrates.

I'm using this temporary fence instead of a wire fence because in a few months, I'll change out the plants for the summer cucumbers and tomatoes.

I use marigolds to keep animals away. They work quite well. I also need the room to walk around the garden, and it's annoying to move the fence every 5 minutes.

Monday, March 4, 2013

Growing Vegetables from Seed Part 4


Part 1: Jiffy Greenhouse | Part 2: Burpee Greenhouse | Part 3: Jiffy Greenhouse Update


Burpee Greenhouse Kit
This is the kit I started with. See the links above for how to start seeds in it.


So far I've had better luck with this kit.


Unlike the Jiffy Greenhouse, 90% of the plants sprouted in ten days, just like their seed packet said.

The kale and brussels sprouts appeared in 5 days.


Burpee Greenhouse
Left to right: brussels sprouts, kale, beets, peas, green beans. Looks like almost all the cells have sprouts in them.


Burpee Greenhouse
Here's an "aerial view" of the seedlings.


As you can see, the cells on the left have not sprouted - the San Marzano tomatoes.


They may be taking longer because of the soil temperature. I'll give them a few more days (or another week) before I break down and get a heater mat.


Burpee Greenhouse
I put this closeup here because it's so nice to actually see the green beans sprouting!

Between the mold on the Jiffy Greenhouse and the seeds that disintegrated instead of sprouting, I like seeing the plants actually growing.

I took this picture a few hours after the one above and the green beans had visibly grown in that time.


Burpee Greenhouse
One week later, all the seedlings have sprouted.

I'll give them another week and then the cold weather plants (peas, kale) are going outside to the garden.

The green beans will be transplanted. I'll leave the others (tomatoes, beets, brussels sprouts) for another few weeks in the kit.

Burpee Greenhouse

I decided to buy another greenhouse so I could start a mesclun mix of greens and spinach. They mostly sprouted up.

The mesclun mix seeds were so small I ended up putting a handful into each cell, so 6-7 sprouted instead of 2-3.

I did have to re-seed a few cells for some reason. Maybe I forgot to put seeds in them?

These guys will also go outside next week with the peas and kale.

Growing Vegetables from Seed Part 3


Part 1 | Part 2


Jiffy GreenhouseAfter 3 weeks, I had mixed results. The columbines were predictably not up yet (they can take up to 4 weeks to sprout), most of the peas sprouted, but only 2 green beans spouted.


The rest got covered in white mold.


Pea, Green Beans, Marigolds 
I cleaned out the unsprouted pellets as best I could of the mold and tried again with new green beans and new peas in the pellets that hadn't grown.


Now, I had only watered the pellets once by this point as per the instructions. 

Only when the pellet is a light brown do they need watering. 

 
 I followed the directions to the letter and still it grew mold. Pretty disappointing.

I decided to keep hope alive for the columbines though.  Surely they wouldn't turn out to be a dud like the green beans.  But still... one month germination period? That's a pretty long time.

Columbines, MarigoldsHowever, one week later, I had columbines! They are the tiny seedlings on the left of the tray.

 I saw no new sprouts in the green bean or pea section, so I gave it up as a lost cause.


The Burpee Greenhouse grew plenty more peas and green beans, I can use them.


Jiffy Greenhouse
Here's a closeup of the sprouts.

Columbines on the left, marigolds on the right.

The weather is still a bit cold, so I'm waiting another week to transplant, outside.


There will be more light on the garden then.

The roots are coming out of the pellets and visiting the other plants next to them, so hopefully the roots won't be a tangled mess in another week.
 
The plants are still growing, so at least I'm doing something right here.

Friday, February 8, 2013

Growing Vegetables from Seedlings Part 2

Storebought Greenhouse Experiment: Jiffy vs. Burpee Greenhouse Kits
Part 2: Burpee Seed Starting 72 Cell Greenhouse Kit


Previously on Winter Seed Starting, I made a fluorescent light hanger and started a flat of spring vegetables with a Jiffy Greenhouse Kit.

Being new to vegetable gardening from seed, I'm testing out two types of indoor greenhouse kits. This article is about the Burpee Greenhouse Kit.

Burpee Greenhouse Kit
72 slots for seedlings may seem like a lot, but my garden will eat it up.
I'll probably need 3-4 of these kits to fill up the entire space.

The greenhouse parts include:


Burpee Greenhouse Kit
(L-R)Plastic clear dome, 2 trays of plant cells (72 total), 72 "Burpee Super Growing Pellets" (inside trays), 1 growing tray, with 2 "plant-o-grams" inside that.

The "plant-o-grams" I assume are the paper inserts and basically I thought they were useless so I tossed them.

I use throwaway wood tongue depressors to write my plant names on. If you use a sharpie, they can get wet without the ink running. The paper will just get wet and indecipherable. The wood will last much longer.

The instructions are simple enough. The greenhouse includes the soil you need and a tray to keep it in. You provide seeds, water, and light.

Burpee Greenhouse Kit
The most important step in putting together the greenhouse is arranging the pellets.

They must be flat-side down in the cell or the pellet won't expand properly. It will make a mess instead.

See the picture on the left as an example of what to do.


Burpee Greenhouse Kit


Top left of this picture I tried to show how much water to add.


The pellet absorbs the water fast, but you should only need to fill 3/4 of the cell to fully expand the pellet.


Burpee Greenhouse Kit


Even if you carefully add water, the pellets won't expand evenly.


You can see on the picture above that the peat moss will get everywhere if you're not careful.


Burpee Greenhouse Kit


After all the pellets have expanded, use a tool like a plastic spoon or tongue depressor to spread out the peat moss in each cell.


Burpee Greenhouse Kit


Once all the peat moss is spread out, time to pick out your seeds of choice.


Vegetable Seeds


Clockwise from top left: Brussel Sprouts, San Marzano Tomatoes, Beets, Peas, Green Beans, Kale.


Burpee Greenhouse Kit

I placed 1-3 seeds on each cell, on top of the peat moss where I could see it clearly. I wanted to make sure I actually put seeds on every cell.


After that, I followed the directions on each seed packet for how deep to plant the seeds.

The peas and green beans need to be planted at 2 in, which barely fit in the peat moss. We'll see if they come up right.


Burpee Greenhouse Kit

After burying all the seeds, sprinkle carefully with some more water to dampen it.

You don't want to accidentally drench the seeds and wash them out of the cells!

Then place the plastic dome on top and place outside of direct sunlight in a warm area. I have mine under a fluorescent light.


Part 3: Jiffy Greenhouse Update

Saturday, January 26, 2013

How to Start Seedlings Indoors

Storebought Greenhouse Experiment: Jiffy vs. Burpee Greenhouse Kits
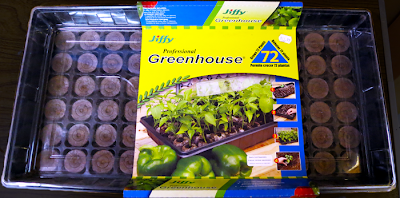
Part 1: Jiffy Professional Greenhouse 72 Cell System


This year, I wanted to start my seedlings indoors to get a head start on the growing season. Most of the vegetable and flowers I'm growing need to grow for 6-8 weeks before transplanting.
Here in Georgia, starting seeds in January is perfectly viable. I've already made a fluorescent light hanger so all I need are seeds to start.

Between my vegetable garden and all the flowerpots, I'll need a few hundred seedlings. I bought two brands of greenhouse kits to try out: the Burpee 72 Cell Greenhouse Kit and the Jiffy Professional Greenhouse 72 Cell Kit.


I'm starting with the latter.

Jiffy Professional Greenhouse

What I liked about this are the peat pellets. You can buy more pellets and reuse the plastic bits over and over. So that could come in handy.


Step One: Pour 10 1/2 c. warm water evenly over the pellets.


Step Two: The pellets are 1 - 1 1/2 in. long when fully expanded, pour off any excess water after pellets have finished expanding.


Step Three: Pull back netting on top of pellets. Fluff and level the top.


Step Four: Sow 2-3 seeds per pellet, following the directions on the seed packet.


I sowed peas, green beans, marigolds, and columbines. According to the seed packets, the marigolds should emerge first, followed by the peas and green beans a week later, and then after a month has passed, the columbines.

Note: In the picture above, there is only one seed.  I only used one green bean seed per pellet. That was a bad idea. You will find out why later.


Step Five: Place dome on tray and keep in a warm location away from direct sunlight.


Directly under fluorescent lights are fine, however.


Two weeks later, I have seedlings! On the left, I have green beans. In the middle, peas. On the right, marigolds. No columbines yet but that should be a few more weeks.


I haven't had to water it yet - the pellets have yet to turn light brown. On the downside, several of the peat pellets have grown mold! All of the marigolds came up, most of the peas as well, but not many green beans.

I'm not sure if it's because of the mold, the fact that they needed to be planted further down in the soil (seed packet said 2 in. deep, peat pellet is only 1 1/2 in.), or some other reason. Like only using one seed per pellet...


So I have mixed results with this greenhouse so far. Let's see how the other one does.