Wednesday, February 20, 2013

Visit to Mounts Botanical Garden, Part 2

Previously, on this blog: a Visit to Mounts Botanical Garden, Part 1.

Here are the rest of the best pictures from that trip.  Starting with two plants I actually know about.


  Bougainvillea.


I've tried and failed to grow this in Georgia.

On several occasions, too, so it's nice to see a healthy one.


Breadfruit!

Never tried it.


Heard it tastes like potatoes and potatoes = bread somehow.

Click the link to learn more!


As a bonus, can you tell what I edited out of this picture?

(Using Photoshop, of course.)


Closeup of the breadfruit.


Still not resembling bread.


Closeup of the Desert Rose from the last post.


I did change the exposure of this one in Camera Raw, but nothing else was required.


The flower is naturally that pink-to-white gradient.
  
I'm wondering how well it does in deserts considering it rains a heck of a lot in Florida.

...And the link to the Desert Rose up above shows that in an arid environment, it's actually a lot bigger and healthier looking than the ones at the botanical garden.


This is a closeup of the waterfall in the shade garden.

It actually was a lot darker in there than the picture shows.

Changing the exposure in Camera Raw really helped this picture.


Here's a picture of the canopy of the shade garden.


On the edges are a few angel trumpet flowers.


This flower is another that's completely unknown to me.

 It's really unusual, it was one of my favorites.

It's unfortunately easy to tell that I had to do a lot of manipulation to it for it to look anywhere like it should.

The colors are much harsher than I wanted.  Oh well.  Still like the plant enough to post it.

And that's my trip to the Mounts Botanical Garden in West Palm Beach, Florida.  I really liked how they maintained their garden.  There are tons more flowers than what I posted here.

They'd be thrilled to have you visit!  The entrance fee is a $5.00 donation using the honor system.

Visit to Mounts Botanical Garden, Part 1


 A few weeks ago, I took a few days to visit my family in Palm Beach. 

We took a trip to the Mounts Botanical Gardens, so I could test out the Canon PowerShot S100.


It can save pictures in the Camera Raw format, which helps out tons when editing pictures in Photoshop.


 One small complaint I have about the Mounts Botanical Garden, other than the mosquitoes (I got eaten alive! In February!) is that very few of the plants had plaques telling you what they were.


I'd love it if someone would be able to help me out with some plant names  in the comments.


This is a Desert Rose. I only know that because it actually had a nameplate.


Probably because it's in a pot.


The picture is a bit too bright for my liking but if it wasn't for Camera Raw it would be even worse.


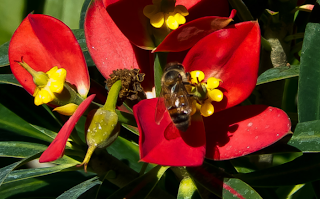
 Hey, a honeybee.  Really happy how this turned out.

I thought the bee would be too small and unnoticeable.

No idea what plant this is.


 This one is a Fire or Mammy Croton.

 I thought it was supposed to be a full sun plant but this one was sitting in the shade garden.


 This one had really soft fuzzy leaves.


I didn't touch it, but I'm just going by how it looks.

Really like how the flowers pop out in the foreground.


 This plant looks like it makes raspberries.

Hint: those aren't raspberries.

I'm a bit disappointed with the blurry foreground but I liked this plant too much to leave out this picture.

The wind was blowing way too hard to get consistently sharp pictures.


 In this picture, if you look closely you can see the sunlight cascading through the trees in the background.


Or its just a glare reflected by the camera.


Either way, it looks pretty.

Still would like to know what plant this is! I've never seen one.


 Okay, enough pictures on this post.  Next post will have the rest.  See you there!


Wednesday, February 13, 2013

Reining and Dressage, Side by Side


Love, love, love this video. First one I've seen showing Reining and Dressage together where riders switch horses. You can see the dedication and hard work it takes in training both animals. Both disciplines have surprising similarities when shown side by side. Both riders are Austrian, and I think the Western rider started out riding Dressage, but don't quote me on that.

Now this being a western blog, I do appreciate the western horse and rider just a biiiit more.

Hint, guess which horse is swishing its tail all over the place. Not the western horse. And also for once, the western horse doesn't have a blocked tail. Hallelujah.

The other thing I love about this video is the size differences in the horses. When they're sidepassing together, they prove the detractors in both disciplines wrong. I've heard both English and Western riders claim that only a horse of a certain size can sidepass/any other maneuver. Not in this case!

Friday, February 8, 2013

Growing Vegetables from Seedlings Part 2

Storebought Greenhouse Experiment: Jiffy vs. Burpee Greenhouse Kits
Part 2: Burpee Seed Starting 72 Cell Greenhouse Kit


Previously on Winter Seed Starting, I made a fluorescent light hanger and started a flat of spring vegetables with a Jiffy Greenhouse Kit.

Being new to vegetable gardening from seed, I'm testing out two types of indoor greenhouse kits. This article is about the Burpee Greenhouse Kit.

Burpee Greenhouse Kit
72 slots for seedlings may seem like a lot, but my garden will eat it up.
I'll probably need 3-4 of these kits to fill up the entire space.

The greenhouse parts include:


Burpee Greenhouse Kit
(L-R)Plastic clear dome, 2 trays of plant cells (72 total), 72 "Burpee Super Growing Pellets" (inside trays), 1 growing tray, with 2 "plant-o-grams" inside that.

The "plant-o-grams" I assume are the paper inserts and basically I thought they were useless so I tossed them.

I use throwaway wood tongue depressors to write my plant names on. If you use a sharpie, they can get wet without the ink running. The paper will just get wet and indecipherable. The wood will last much longer.

The instructions are simple enough. The greenhouse includes the soil you need and a tray to keep it in. You provide seeds, water, and light.

Burpee Greenhouse Kit
The most important step in putting together the greenhouse is arranging the pellets.

They must be flat-side down in the cell or the pellet won't expand properly. It will make a mess instead.

See the picture on the left as an example of what to do.


Burpee Greenhouse Kit


Top left of this picture I tried to show how much water to add.


The pellet absorbs the water fast, but you should only need to fill 3/4 of the cell to fully expand the pellet.


Burpee Greenhouse Kit


Even if you carefully add water, the pellets won't expand evenly.


You can see on the picture above that the peat moss will get everywhere if you're not careful.


Burpee Greenhouse Kit


After all the pellets have expanded, use a tool like a plastic spoon or tongue depressor to spread out the peat moss in each cell.


Burpee Greenhouse Kit


Once all the peat moss is spread out, time to pick out your seeds of choice.


Vegetable Seeds


Clockwise from top left: Brussel Sprouts, San Marzano Tomatoes, Beets, Peas, Green Beans, Kale.


Burpee Greenhouse Kit

I placed 1-3 seeds on each cell, on top of the peat moss where I could see it clearly. I wanted to make sure I actually put seeds on every cell.


After that, I followed the directions on each seed packet for how deep to plant the seeds.

The peas and green beans need to be planted at 2 in, which barely fit in the peat moss. We'll see if they come up right.


Burpee Greenhouse Kit

After burying all the seeds, sprinkle carefully with some more water to dampen it.

You don't want to accidentally drench the seeds and wash them out of the cells!

Then place the plastic dome on top and place outside of direct sunlight in a warm area. I have mine under a fluorescent light.


Part 3: Jiffy Greenhouse Update