Wednesday, February 13, 2013

Reining and Dressage, Side by Side


Love, love, love this video. First one I've seen showing Reining and Dressage together where riders switch horses. You can see the dedication and hard work it takes in training both animals. Both disciplines have surprising similarities when shown side by side. Both riders are Austrian, and I think the Western rider started out riding Dressage, but don't quote me on that.

Now this being a western blog, I do appreciate the western horse and rider just a biiiit more.

Hint, guess which horse is swishing its tail all over the place. Not the western horse. And also for once, the western horse doesn't have a blocked tail. Hallelujah.

The other thing I love about this video is the size differences in the horses. When they're sidepassing together, they prove the detractors in both disciplines wrong. I've heard both English and Western riders claim that only a horse of a certain size can sidepass/any other maneuver. Not in this case!

Friday, February 8, 2013

Growing Vegetables from Seedlings Part 2

Storebought Greenhouse Experiment: Jiffy vs. Burpee Greenhouse Kits
Part 2: Burpee Seed Starting 72 Cell Greenhouse Kit


Previously on Winter Seed Starting, I made a fluorescent light hanger and started a flat of spring vegetables with a Jiffy Greenhouse Kit.

Being new to vegetable gardening from seed, I'm testing out two types of indoor greenhouse kits. This article is about the Burpee Greenhouse Kit.

Burpee Greenhouse Kit
72 slots for seedlings may seem like a lot, but my garden will eat it up.
I'll probably need 3-4 of these kits to fill up the entire space.

The greenhouse parts include:


Burpee Greenhouse Kit
(L-R)Plastic clear dome, 2 trays of plant cells (72 total), 72 "Burpee Super Growing Pellets" (inside trays), 1 growing tray, with 2 "plant-o-grams" inside that.

The "plant-o-grams" I assume are the paper inserts and basically I thought they were useless so I tossed them.

I use throwaway wood tongue depressors to write my plant names on. If you use a sharpie, they can get wet without the ink running. The paper will just get wet and indecipherable. The wood will last much longer.

The instructions are simple enough. The greenhouse includes the soil you need and a tray to keep it in. You provide seeds, water, and light.

Burpee Greenhouse Kit
The most important step in putting together the greenhouse is arranging the pellets.

They must be flat-side down in the cell or the pellet won't expand properly. It will make a mess instead.

See the picture on the left as an example of what to do.


Burpee Greenhouse Kit


Top left of this picture I tried to show how much water to add.


The pellet absorbs the water fast, but you should only need to fill 3/4 of the cell to fully expand the pellet.


Burpee Greenhouse Kit


Even if you carefully add water, the pellets won't expand evenly.


You can see on the picture above that the peat moss will get everywhere if you're not careful.


Burpee Greenhouse Kit


After all the pellets have expanded, use a tool like a plastic spoon or tongue depressor to spread out the peat moss in each cell.


Burpee Greenhouse Kit


Once all the peat moss is spread out, time to pick out your seeds of choice.


Vegetable Seeds


Clockwise from top left: Brussel Sprouts, San Marzano Tomatoes, Beets, Peas, Green Beans, Kale.


Burpee Greenhouse Kit

I placed 1-3 seeds on each cell, on top of the peat moss where I could see it clearly. I wanted to make sure I actually put seeds on every cell.


After that, I followed the directions on each seed packet for how deep to plant the seeds.

The peas and green beans need to be planted at 2 in, which barely fit in the peat moss. We'll see if they come up right.


Burpee Greenhouse Kit

After burying all the seeds, sprinkle carefully with some more water to dampen it.

You don't want to accidentally drench the seeds and wash them out of the cells!

Then place the plastic dome on top and place outside of direct sunlight in a warm area. I have mine under a fluorescent light.


Part 3: Jiffy Greenhouse Update

Saturday, January 26, 2013

How to Start Seedlings Indoors

Storebought Greenhouse Experiment: Jiffy vs. Burpee Greenhouse Kits
Part 1: Jiffy Professional Greenhouse 72 Cell System


This year, I wanted to start my seedlings indoors to get a head start on the growing season. Most of the vegetable and flowers I'm growing need to grow for 6-8 weeks before transplanting.
Here in Georgia, starting seeds in January is perfectly viable. I've already made a fluorescent light hanger so all I need are seeds to start.

Between my vegetable garden and all the flowerpots, I'll need a few hundred seedlings. I bought two brands of greenhouse kits to try out: the Burpee 72 Cell Greenhouse Kit and the Jiffy Professional Greenhouse 72 Cell Kit.


I'm starting with the latter.

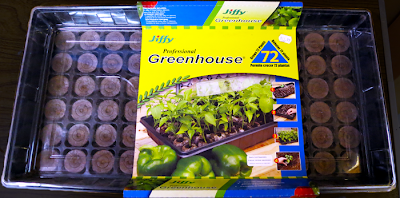
Jiffy Professional Greenhouse

What I liked about this are the peat pellets. You can buy more pellets and reuse the plastic bits over and over. So that could come in handy.


Step One: Pour 10 1/2 c. warm water evenly over the pellets.


Step Two: The pellets are 1 - 1 1/2 in. long when fully expanded, pour off any excess water after pellets have finished expanding.


Step Three: Pull back netting on top of pellets. Fluff and level the top.


Step Four: Sow 2-3 seeds per pellet, following the directions on the seed packet.


I sowed peas, green beans, marigolds, and columbines. According to the seed packets, the marigolds should emerge first, followed by the peas and green beans a week later, and then after a month has passed, the columbines.

Note: In the picture above, there is only one seed.  I only used one green bean seed per pellet. That was a bad idea. You will find out why later.


Step Five: Place dome on tray and keep in a warm location away from direct sunlight.


Directly under fluorescent lights are fine, however.


Two weeks later, I have seedlings! On the left, I have green beans. In the middle, peas. On the right, marigolds. No columbines yet but that should be a few more weeks.


I haven't had to water it yet - the pellets have yet to turn light brown. On the downside, several of the peat pellets have grown mold! All of the marigolds came up, most of the peas as well, but not many green beans.

I'm not sure if it's because of the mold, the fact that they needed to be planted further down in the soil (seed packet said 2 in. deep, peat pellet is only 1 1/2 in.), or some other reason. Like only using one seed per pellet...


So I have mixed results with this greenhouse so far. Let's see how the other one does.

Friday, January 18, 2013

How to Build a Grow Light Hanger for Seedlings


Part 1 | Part 2


After cutting your PVC pipe, it's time to put it together. Do not glue it until you're sure everything will fit together. In fact, you may not have to glue all of it. I would highly recommend gluing the parts that bear weight, however.

Begin assembling the braces of the light stand like so:

Grow Light Hanger Parts
  1. 90° elbow
  2. 1 in. section
  3. Tee
  4. 12 in. section
  5. 18 in. section
Here is another view of the completed side brace:

Putting together the Grow Light Stand

  1. 12 in. section
  2. 45° elbow
  3. 9 in. section
  4. 45° elbow connected to 1 in. piece connected to a tee (and then vice versa)
  5. 18 in. section
  6. Tee connected to 1 in. piece connected to 90° elbow
When both braces are completed, you should only have the 3 48 in. sections left to attach. You can then begin fitting the longer lengths into the tees and elbows and gluing them, making sure the connections are straight.

These parts are the easiest to glue first:

Grow Light Stand Parts
  1.  48 in. section connected to a tee on both ends
  2. Two 48 in. sections connected to 90° on both ends
  3. Four 12 in. sections connected to a tee on one end
  4. Four 9 in. sections connected to 45° on both ends (not pictured)

I used heavy duty PVC cement so I would have a bit more time to set up the objects to be glued. Even though I used a slower drying cement, the glue still set quickly. I did accidentally glue the wrong sections together and had to use a wrench (shown below) to get it apart.


Grow Light Stand


The cement should come with its own applicator, which helps quite a bit. Try not to get any on your skin, it is a pain to get off later. Rubber gloves may be best if you want to keep your hands clean. The PVC cement will put off a tremendous amount of fumes, so either glue this outside or have a window or door open with a lot of fans going to air it out.


Grow Light Hanger


After you glued the long sections to the elbows and tees, let it dry for 12-14 hours even though the PVC pipes felt solid after 20 minutes. I waited until the smell had gone, which took until the next day.

The next day, you can glue (or not glue, whichever you prefer) the bottom of the stand together:


Gluing together Plant Light Stand
  1. 12 in. section connected by tee connected to a...
  2. 90° elbow connected to a 48 in. section
  3. 18 in. section connected to two 12 in sections
The elbows are connected to the tees with a 1 in. section. After gluing the base, you may either wait another few hours before attaching the rest of the PVC pipe or go ahead and continue.

 The upper part of the structure is attached like this:

Completed Grow Light Stand
  1. 45° elbow-ended 9 in sections are first attached and glued to the four 12 in. sections
  2. Four 1 in. pieces are then connected to the other end of the 45° elbows
  3. The 48 in. length is connected to the 1 in. pieces by the tees. The tees should already be glued to the 48 in. length.
You should wait an additional 12-14 hours for the cement to dry before you attach the shop light. I bought the most no-frills light available, the only way to turn the light on is to plug it in. You can get as fancy or as plain as you want when choosing a shop light, just as long as it fits the light stand. I used T12 because I already had the lights for it.

When it comes to the lights, I used aquarium lights. You have a lot of options, check out this article for some suggestions.

After the stand is all dry, or whenever you can no longer smell the cement, feel free to attach your shop light and put some plants and/or seedlings underneath.


Grow Light Stand


As you can see from the picture above, I wrapped the shop light chain around the tee instead of the pipe for added stability. Just something to think about.

Also, I lowered the chain so it was almost touching the plastic greenhouses after I took this picture. You'll want to keep your lights really close to the plants. You can move the light up as they grow.

Thursday, January 17, 2013

How to Build a Grow Light Stand for Plants and Seedlings

Even in the South, January is an unforgiving month for growing vegetables. 

However, since early Spring weather is only a few weeks long here in Georgia, you really need to start your Spring seedlings in January or early February for them to produce before it gets too hot. 

Grow Light Hanger for Plants and Seedlings

This means you need to start seedlings indoors. And you don’t need to buy a fancy grow light hanger. You can build one yourself in a few hours for a few bucks.

This Grow Light Hanger is inspired by the Georgia Gardener's tips on building a PVC pipe light stand. His instructions are available here

Here's what you need to get started:


Equipment for Grow Light Stand


  1. 1 Shop Light (T 12)
  2. PVC Cement (Heavy Duty) and a PVC Ratcheted Pipe Cutter
  3. 6 1/2 in. PVC Tees
  4. 8 1/2 in. PVC 45° elbows
  5. 3 10 ft. lengths of 1/2 in Schedule 40 PVC Pipe
  6. Measuring Tape and a Marker
  7. 4 1/2 in. PVC 90° elbows
  8. 2 Fluorescent Grow Lights (T 12)

Once you've gone to Home Depot or Lowe's or whatever hardware store you prefer, set up your building area. Now the PVC cement will need to dry in a well ventilated area, so if you have good weather you can build outside. I built mine in a basement garage, so I had several fans going for ventilation when I glued everything together.

Make sure you bought Schedule 40 PVC pipe, elbows, and tees. It won't fit together correctly otherwise.


Measuring your PVC pipes for a Grow Light Stand

 
Next, get ready to cut your PVC pipe. This is where your measuring tape and your marker come in handy. I use the adage "measure twice, cut once" and it's never let me down.


Cut your PVC pipe into the following sections:
  1. 3 lengths of 48 in. pipe
  2. 2 lengths of 18 in. pipe
  3. 4 lengths of 12 in. pipe
  4. 4 lenghts of 9 in. pipe
  5. 8 lengths of 1 in. pipe

I used a ratcheting PVC pipe cutter instead of a handsaw. As you can see from the picture, you can cut one-handed with the pipe cutter. A handsaw leaves rough edges and takes a lot longer.

 
Using a Ratcheting PVC pipe cutter


On to part 2.

Wednesday, January 2, 2013

Turkey Soup with Mushrooms (an Answer to the Leftover Turkey Dilemma)


 Whether you're looking to use up your Thanksgiving (or other holiday) turkey, or just looking for another use for some turkey legs you have stashed in the freezer, this soup recipe will lead to easy and tasty results.


Ingredients for Turkey Soup with Mushrooms
From L-R: Sweet onion, thyme, celery, garlic, shallot, carrots, leeks,
mushrooms, turkey, chicken stock, more mushrooms
First, the ingredients:

  • ½ oz mixed dried mushrooms
  • 2 tbs olive oil
  • 3 leeks (including tender green parts, coarsely chopped)
  • ½ lbs fresh white button mushrooms (coarsely chopped)
  • ¼ lb fresh shiitake mushrooms (stemmed and coarsely chopped)
  • 2 carrots (peeled and coarsely chopped)
  • ½ c. pearl barley
  • 3 large garlic cloves (minced)
  • 2 turkey thighs, about 1.5 lbs
  • 2 tsp soy sauce
  • 8 c. chicken or beef stock or prepared broth
  • 3 tbs finely chopped fresh flat-leaf parsley
  • Salt and freshly ground pepper (to taste)


Clockwise from bottom left: turkey, button mushrooms, chicken stock,
pearl barley, shiitake and other mushrooms.
Now you may notice from the picture that it doesn't match the ingredients list.  

You would be right! You can substitute vegetables to an extent, and that is what I did when making this soup.  

I wanted to use all of the leftover turkey from Thanksgiving; bones, skin and all (you remove the bones and skin later).


Coarsely chop carrots and celery, clean and slice mushrooms,
mince garlic, wrap thyme in twine and add after chicken stock.


To balance that out, I added more vegetables, like the celery, onion, and shallot. I had no dried mushrooms, so I substituted with more fresh mushrooms.

I had a bunch of thyme left over from Thanksgiving as well, so I chucked that in the soup pot too.


If you strictly go by the listed ingredients and use the dried mushrooms, first do the following: 


  • Soak the dried mushrooms in 2c boiling water for 30 min
  • Drain mushrooms, reserving 1c liquid
  • Strain liquid in fine-mesh sieve or cheesecloth or coffee filter to remove any debris
  • Squeeze the mushrooms dry with a clean kitchen towel or paper towels.
  • Cut into ¼ in dice. Reserve.

Chopped leeks, onions, carrots and celery
In a large soup pot over medium-high heat, warm the oil. 

Add the leeks and carrots (and onion and celery, if you want) and sauté until softened, 5-7 min.

 Stir in the fresh mushrooms, barley and garlic. Saute for 1 min longer. 

 Add the thyme wrapped with butchers twine at this point if you want.


After adding stock, simmer for 1.5 hours or until the barley is tender.
Add the turkey and stock, reduce the heat to low, cover, and simmer until the barley is tender but not mushy – about 1.5 hours.

Remove the turkey thighs from the pot. Discard the skin and cut the meat from the bones.  

Shred the meat into bite-sized pieces and return to the pot.  The meat will hopefully shred easily between two forks.  Add the reserved mushrooms and soaking liquid.
Stir in the soy sauce and chopped parsley and let simmer for 5 min longer. Season to taste with salt and pepper. Remove thyme at this point.

This tastes great with freshly baked bread or freshly toasted croutons.  Enjoy!


The finished soup, with freshly baked ciabatta as an accompaniment.


Tuesday, December 4, 2012

Southern White Chili Recipe

Georgia Southern White Chicken Chili


This chili is a fall favorite. It's dairy-free without garnish, the color only comes from the chicken, beans, and stock. You can make it as mild or as spicy as you want.


  • 1 ½ pounds boneless/skinless chicken breast
  • 1 tablespoon Canola oil
  • 1 teaspoon minced garlic
  • 1 cup chopped onion (white)
  • 3 cans (15 oz.) Great Northern beans, drained
  • 2 teaspoons cumin
  • ¼ teaspoon cayenne pepper
  • ½ can (14 oz.) chicken broth
  • ¼ cup (or more) white wine
  • Salt and pepper, to taste
Optional Garnish:
  • Shredded Monterey Jack cheese
  • Crushed Tortilla chips
  • Fresh salsa
  • Avocado or guacamole
  • Sour Cream


Chop the chicken breast into small bite-sized cubes. Sprinkle with salt and pepper.
In a five-quart, clean pot (this part is soo tough for me!), heat oil on a medium to medium-high stove. Add chicken and saute until cooked through.
If bits stick to the bottom, great! That's flavor for later. It's called fond. Remove chicken when cooked through with slotted spoon.


If the chicken is a bit pink still, it's okay, it will cook through later.


Into same pot, cook onion and garlic over medium heat until tender.
Add a pinch of salt and pepper for flavor and to sweat more moisture out of the onions. Add more oil if necessary.
You may want to cook the onions first, because garlic cooks much faster and can burn easily.


Then, add beans, spices, and the white wine. This is a good time to scrape up the drippings at the bottom of the pot (the fond) and mix with the veggies. Simmer the wine for 2-3 minutes.


Stir in the remaining “stuff” (including cooked chicken) except garnish. Bring to boil, then reduce to simmer for 30 minutes.
Add salt and pepper to taste. Serve sprinkled with cheese, chips, or other garnish.
Should serve four if they aren’t too hungry, if they are, add more chicken broth!


I have found this to coordinate well with most adult beverages during preparation and eating. You may see that after eating additional beverages are pleasant as well. Properly “marinated” guests find meals like this just “so creative”. 


Recipe courtesy the Cowboy Cook.